 +1 829 698 0733
What Do You Need? Talk To Us
+1 829 698 0733
What Do You Need? Talk To Us8am-4pm EST/NY Monday-Friday info@aareff.com

Transmitter Monitoring and Control Dashboard
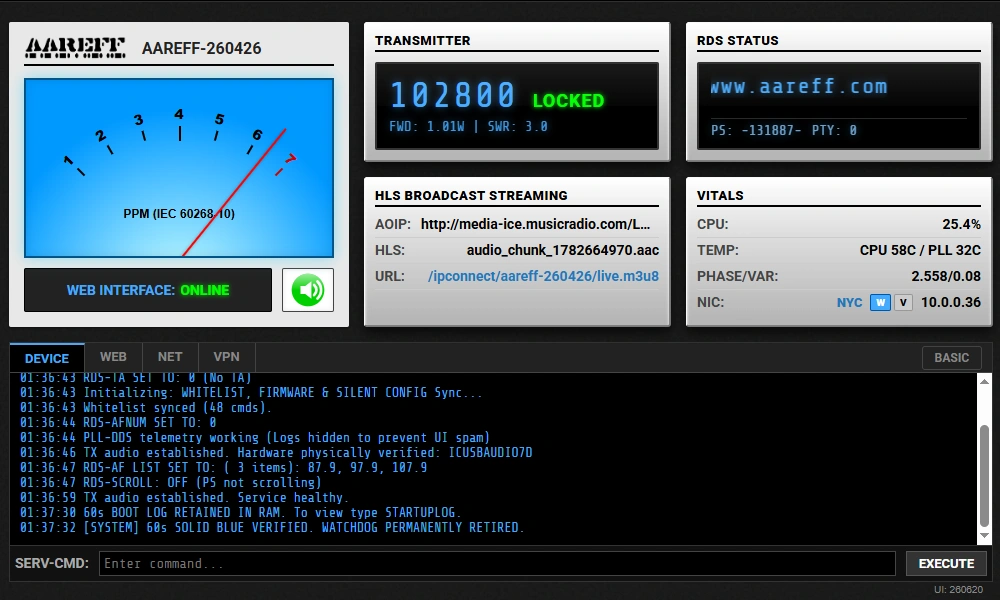
Accessing Your Dashboard
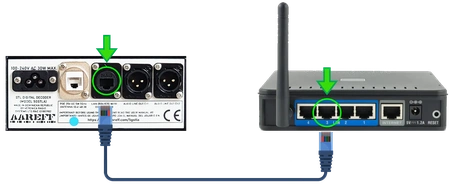
Locate the RJ45 LAN connector on the rear panel of your unit. The connector position may vary between AAREFF models. Using a standard CAT5e or CAT6 network cable, connect the unit to a spare LAN port on your router. Allow approximately one minute for the unit to obtain an IP address automatically.
Once connected, the dashboard can be opened using either of the methods below. The default dashboard password is your unique six-digit sale/order number. For example: 654321.
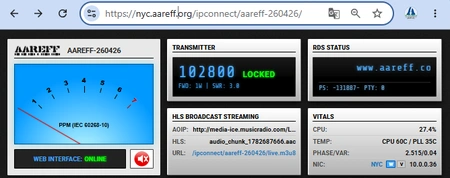
1. WITH AN INTERNET CONNECTION
Enter the following address in your browser:
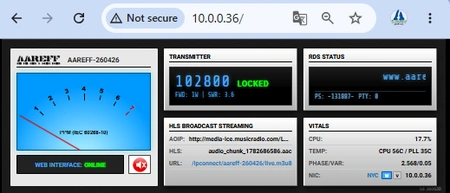
For example, the unit shown in the image uses:
2. WITHOUT AN INTERNET CONNECTION (LAN ONLY)
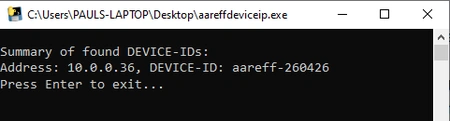
If the local network does not have Internet access, use the AAREFF Device IP Utility to locate the unit. The utility can be downloaded on another Windows PC and copied to the local computer if necessary.
https://www.aareff.com/aareffdeviceip.exe
Run the utility and locate the Address shown for your AAREFF device. Enter that LAN IP address into the browser address bar. In the example shown, the address is 10.0.0.36.
Adjusting Power and Frequency
SETTING THE TRANSMIT FREQUENCY
Enter the required frequency in MHz in the SERV-CMD box and press EXECUTE.
Format: FREQ:[frequency-in-MHz]
SETTING THE TRANSMITTER POWER
Enter a value between 0 and 1 in the SERV-CMD box and press EXECUTE.
Format: PWR:[0 to 1]
0 represents the minimum transmitter power setting and 1 represents the maximum setting. Values outside this range are not accepted.
The PWR value is a drive-control setting and is not a direct percentage of RF output. For example, PWR:0.5 does not necessarily produce half the rated transmitter power. Adjust the value while observing FWD in the TRANSMITTER panel until the required forward power is reached.
AoIP Audio Input
The balanced analogue XLR inputs and the decoded AoIP (Audio over IP) signal are summed before the AUDIO PROCESSING stage. This allows both sources to be present without requiring a manual input selector.
If only analogue XLR audio is required, disable the digital input by entering AOIP_SOURCE=DISABLED in SERV-CMD and pressing EXECUTE. If only AoIP audio is required, leave the XLR inputs disconnected.

CONFIGURING THE AoIP DIGITAL AUDIO INPUT
The AoIP decoder supports two network-audio methods: a standard HTTP/HTTPS stream or a low-latency RTP stream. Choose the method you are using below.
1. DISABLE AoIP
Disables the AoIP decoder. Only audio from the analogue XLR inputs will pass.
2. HTTP / HTTPS STREAM
Use this option when the transmitter is receiving a normal Internet audio-stream URL.
Example of an HTTP/HTTPS audio source. The transmitter will decode and route the stream to the audio processing stage.
3. RTP STREAM (ADVANCED)
Use this option only when audio is being sent to the transmitter as an RTP stream.
Receives an RTP audio stream on UDP port 5004 from the local network.
Example RTP / SDP settings — enter each required setting separately in SERV-CMD. The first command is shown below as an example:
Additional SDP commands:
SDP_SR=48000
SDP_CH=2
SDP_BIT=16
SDP_PAYLOAD_TYPE=96
4. AoIP LEVEL ADJUSTMENT — HTTP/HTTPS AND RTP
TRANSMITTER: Controls the gain of the D-to-A stage shown in the audio diagram above. Typical settings are between 0 dB and -3 dB. Adjustment outside this range is normally required only when the source audio level is unusually high or low.
ENCODER: Controls the gain of the OPUS RTP STL stream. It does not change the HLS stream level.
Examples: AOIP_DB=0, AOIP_DB=-3.
HLS (HTTP Live Streaming)
ENGINEERING AUDIO MONITORING
The output of the AUDIO PROCESSING stage feeds the transmitter stereo coder and is also sent to the CPU, where it is encoded as HLS (HTTP Live Streaming). The HLS stream is available on the local network and, when Internet access is available, through AAREFF servers for remote monitoring.
This facility is intended primarily for station technical staff and engineers who need to monitor transmitted audio remotely.
PUBLIC HLS STREAMING
The same HLS stream can also be used for public listening through a station website or another compatible platform. The transmitter includes an HLS encoder and VPN connection designed to operate through typical routers, firewalls and NAT connections, including fixed broadband, Starlink and mobile data networks.
In normal operation, no router port-forwarding or additional network configuration is required.
WEBSITE PLAYER
This player can be embedded directly into a website and can also display the current RDS text.
Press the red speaker icon to hear the demonstration transmitter operating from the AAREFF workshop in the Dominican Republic.
To use the player on your own website, copy the iframe code below and replace aareff-260426 with the device number of your transmitter.
<iframe
  src='https://www.aareff.com/ipconnect/aareff-260426/player.htm'
  width='350'
  height='280'
  style='border:none; overflow:hidden;'
  scrolling='no'
  allow='autoplay'>
</iframe>
TuneIn AND OTHER RADIO DIRECTORIES
The public HLS URL is shown in the white STREAMING panel. In this example:
https://www.aareff.com/ipconnect/aareff-260426/live.m3u8
This URL can be:
- Opened directly in a compatible browser or media player
- Submitted to TuneIn or another radio directory
- Used in a custom web player on your own website
RDS (Radio Data System)
Enter RDS commands in the SERV-CMD box and press EXECUTE. For example:
Where a command requires a value, use a colon : between the command and the value unless the command format shown below uses an equals sign.
RDS-OFF
RDS-PI[0000 to FFFF hexadecimal]
RDS-PS:[any string up to 8 chars.]
RDS-MS:[0 or 1]
RDS-TP:[0 or 1]
RDS-TA:[0 or 1]
RDS-AFNUM:[0 to 15]
RDS-AF:[up to 15 frequencies, eg. 88.1, 88.7, 94.8]
RDS-PTY:[0 to 31 PTY code]
RDS-RT:[any string up to 64 chars.]
RDS-RT-PERM[any string up to 64 chars.]
RDS-SCROLL:[0 or 1]
View the list of RDS PTY codes
RDS-RT is intended for live or playout-controlled RadioText and can be changed in real time. RDS-RT-PERM is stored in flash memory and is used as the default RadioText after power-up.
DYNAMIC RDS
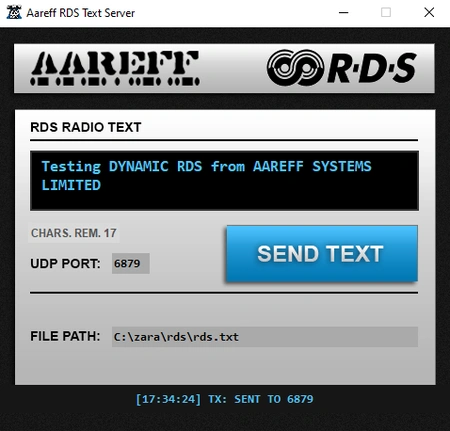
The RDS-RT text can be updated automatically from an external studio computer, an HTTP/HTTPS text URL or a Google Drive source. Typical update intervals are approximately 10 seconds.
RDS_URL=[http://domain.com/rds.txt]
RDS_URL=GDRIVE:[1xY2z3A4b5C6d7E8f9G0]
STUDIO PC RDS TEXT SERVER
If the studio computer and transmitter are connected to the same LAN by Ethernet or Wi-Fi, the AAREFF RDS Text Server utility provides a simple interface for updating the 64-character RadioText displayed on listeners' receivers.
https://www.aareff.com/rds-text-server.exe
Connecting to Wi-Fi (if enabled)
1. SCAN FOR AVAILABLE WI-FI NETWORKS
Enter the following command in the SERV-CMD box and press EXECUTE:
The available SSIDs and their approximate signal strengths will be shown under the WEB tab. Example:
21:36:40 -> Veronica Radio Systems (80%)
21:36:40 -> JJBV (67%)
21:36:40 -> Veronica Radio Test Room (67%)
21:36:40 -> NTGR_VMB_1508674646 (44%)
21:36:40 -> JJBV 5G (42%)
2. CONNECT TO A WI-FI NETWORK
Enter the network name, auto-connect setting and Wi-Fi password using the following format:
Example:
Press EXECUTE. The WEB log will report whether the connection attempt was successful.
The middle value controls automatic connection. Use 1 to enable auto-connect or 0 to disable it.
3. CONFIRM THE WI-FI CONNECTION
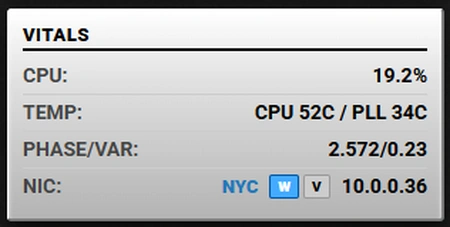
The simplest way to confirm that Wi-Fi is connected is to check the VITALS panel. A square containing the letter W is displayed when a Wi-Fi interface is available. Click the W so that it turns blue; the IP address assigned to the Wi-Fi connection will then be shown to the right.
If no W is shown, there is no active Wi-Fi connection.
You can also enter WIFI_PARAMETERS without additional values to display the current Wi-Fi parameter information in the WEB tab:
The letter L in the VITALS panel represents the wired LAN connection. Click L so that it turns blue to display the wired LAN IP address.
Changing the Dashboard Password
After you are familiar with the dashboard, you can change the default password if required.
Enter the command shown on the right in the SERV-CMD box and press EXECUTE.
Use the underscore character _ in LAN_PASSWORD. If the command is accepted, confirmation will appear in the log under the WEB tab.
18:16:10 LAN password updated successfully
Rebooting
SOFT FIRMWARE REBOOT
You can restart all internal firmware without rebooting the transmitter's internal computer. This is a fast soft reboot and normally takes approximately 2 seconds.
FULL SYSTEM REBOOT
To reboot the complete internal computer, use the command below. This performs the same full internal-computer restart as power-cycling the unit and normally takes approximately 55 seconds.